# Creating Execution List

Step-by-step process to create execution profile in Avo Assure:

1. On the **Home** page, under **Projects**, select the desired Project from the list.
2. Select the **Design Studio** and navigate to **Execution** tab.
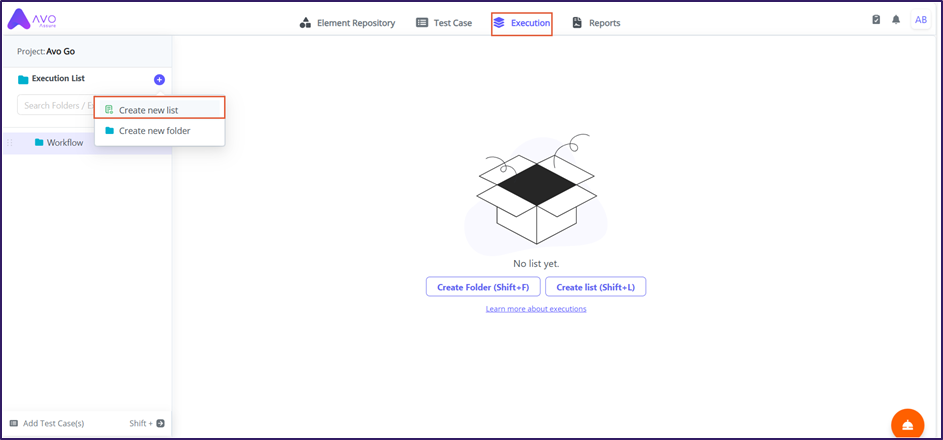
3. Select **Create new folder** from **Execution** tab.&#x20;
4. Here are the ways to create a new folder:

<details>

<summary><strong>a.</strong> <strong>Plus icon</strong> (<strong>+</strong>)</summary>

1. Select Plus icon **(+)** from left panel of the **Execution** tab.
2. Select **Create new folder**.

<figure><img src="https://2174257472-files.gitbook.io/~/files/v0/b/gitbook-x-prod.appspot.com/o/spaces%2Fk8QZzXZMIJSStKAzDSTu%2Fuploads%2FqXl1QfnEYcPks1E7L4OV%2Fimage.png?alt=media&#x26;token=4be9ac83-79f6-440c-a71b-d12d83f8e989" alt=""><figcaption></figcaption></figure>

3. Rename the folder with appropriate name.

<figure><img src="https://2174257472-files.gitbook.io/~/files/v0/b/gitbook-x-prod.appspot.com/o/spaces%2Fk8QZzXZMIJSStKAzDSTu%2Fuploads%2FOykKSG7OGblabc12HZj9%2Fimage.png?alt=media&#x26;token=98771c6c-3856-422a-af84-704c864f3336" alt=""><figcaption></figcaption></figure>

</details>

<details>

<summary><strong>b.</strong>  <strong>Create Folder</strong></summary>

1. Select **Create Folder**. It is located at the center of the **Execution** tab.

{% hint style="info" %}
**Note**: You can use the shortcut key **Shift+F** to create a new folder.
{% endhint %}

<figure><img src="https://2174257472-files.gitbook.io/~/files/v0/b/gitbook-x-prod.appspot.com/o/spaces%2Fk8QZzXZMIJSStKAzDSTu%2Fuploads%2FwoxYQuHw3K183CwgzsUq%2Fimage.png?alt=media&#x26;token=bc7a8da9-ded1-4ac6-8045-089aafdffa30" alt=""><figcaption></figcaption></figure>

2. Rename the folder with an appropriate name.

<figure><img src="https://2174257472-files.gitbook.io/~/files/v0/b/gitbook-x-prod.appspot.com/o/spaces%2Fk8QZzXZMIJSStKAzDSTu%2Fuploads%2FrJGwqRGU72msNLkZX5fQ%2Fimage.png?alt=media&#x26;token=56225827-704f-4250-8ad4-7996b101ebe4" alt=""><figcaption></figcaption></figure>

</details>

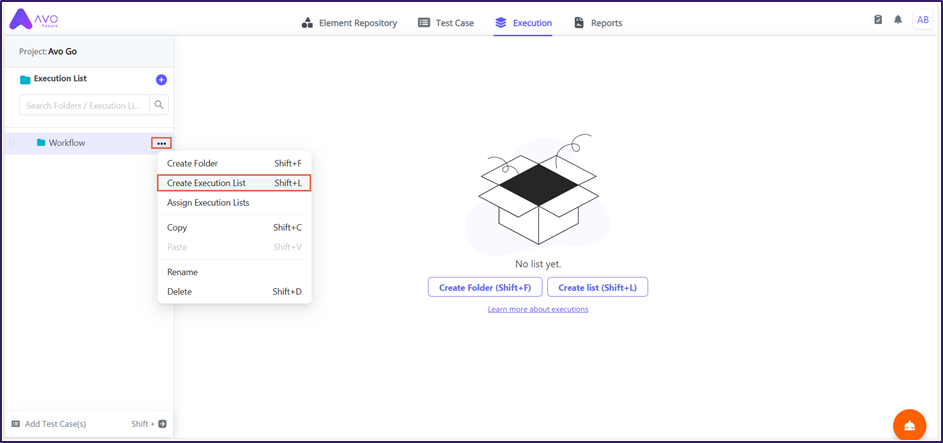
5. Select **Create Execution List** from **Execution** tab.
6. Here are the ways to create a new folder:

<details>

<summary><strong>a. Plus icon</strong> (+)</summary>

1. Select Plus icon **(+)** from left panel of the **Execution** tab.
2. Select **Create new list** option.

<div align="left"><figure><img src="https://2174257472-files.gitbook.io/~/files/v0/b/gitbook-x-prod.appspot.com/o/spaces%2Fk8QZzXZMIJSStKAzDSTu%2Fuploads%2F0tTsKgkWomBrUX8jOelT%2Fimage.png?alt=media&#x26;token=f7acd00b-d5d2-47ae-9293-320da16f53f0" alt=""><figcaption></figcaption></figure></div>

3. Rename the Execution List with an appropriate name.

<figure><img src="https://2174257472-files.gitbook.io/~/files/v0/b/gitbook-x-prod.appspot.com/o/spaces%2Fk8QZzXZMIJSStKAzDSTu%2Fuploads%2FGF2mUYWnZfmUEppH6AnI%2Fimage.png?alt=media&#x26;token=1049d60c-b972-4dc0-9744-0d2e857bb78f" alt=""><figcaption></figcaption></figure>

</details>

<details>

<summary><strong>b.</strong> <strong>Ellipsis</strong> icon (<strong>...</strong>)</summary>

1. Select Ellipsis icon **(...)** from the folder.
2. Select **Create Execution List** option.

<figure><img src="https://2174257472-files.gitbook.io/~/files/v0/b/gitbook-x-prod.appspot.com/o/spaces%2Fk8QZzXZMIJSStKAzDSTu%2Fuploads%2FYzklpfL0GLg7Tf9doTLZ%2Fimage.png?alt=media&#x26;token=2270dc01-b3bc-4542-876c-81acd56dc302" alt=""><figcaption></figcaption></figure>

3. Rename the Execution List with an appropriate name.

{% hint style="info" %}
**Note**: You can use the shortcut key **Shift+L** to create a new Execution List.
{% endhint %}

<figure><img src="https://2174257472-files.gitbook.io/~/files/v0/b/gitbook-x-prod.appspot.com/o/spaces%2Fk8QZzXZMIJSStKAzDSTu%2Fuploads%2FGF2mUYWnZfmUEppH6AnI%2Fimage.png?alt=media&#x26;token=1049d60c-b972-4dc0-9744-0d2e857bb78f" alt=""><figcaption></figcaption></figure>

</details>

<details>

<summary><strong>c. Create list</strong></summary>

1. Select **Create List.** It is at the center of the **Execution** tab.

<figure><img src="https://2174257472-files.gitbook.io/~/files/v0/b/gitbook-x-prod.appspot.com/o/spaces%2Fk8QZzXZMIJSStKAzDSTu%2Fuploads%2FTEnOURtUl9q9kAHakVve%2Fimage.png?alt=media&#x26;token=8e91c5ab-df68-483f-9ad7-54ea3a08d286" alt=""><figcaption></figcaption></figure>

3. Rename the Execution List with an appropriate name.

{% hint style="info" %}
**Note**: You can use the shortcut key **Shift+L** to create a new Execution List.
{% endhint %}

<figure><img src="https://2174257472-files.gitbook.io/~/files/v0/b/gitbook-x-prod.appspot.com/o/spaces%2Fk8QZzXZMIJSStKAzDSTu%2Fuploads%2FGF2mUYWnZfmUEppH6AnI%2Fimage.png?alt=media&#x26;token=1049d60c-b972-4dc0-9744-0d2e857bb78f" alt=""><figcaption></figcaption></figure>

</details>

7. Select **Profile Type** from the dropdown. Select either **Functional** or **Accessibility.**

* **Functional:** This profile type is used for regular execution modules, and it focuses on application's function.
* **Accessibility:** This profile type is especially created for people with disabilities to use applications easily parallelly ensuring the platform’s availability for everyone while ensuring a good experience.

{% hint style="info" %}
To learn more about Accessibility, refer to [Accessibility](https://docs.avoautomation.com/working-with-the-avo-assure-platform/create-and-execute-tests-with-design-studio/working-with-execution-section/creating-execution-list/accessibility-test).
{% endhint %}

<figure><img src="https://2174257472-files.gitbook.io/~/files/v0/b/gitbook-x-prod.appspot.com/o/spaces%2Fk8QZzXZMIJSStKAzDSTu%2Fuploads%2FaKKSrxXkeJp7DiFeeyjo%2Fimage.png?alt=media&#x26;token=8f2fc84d-a9ef-4140-a44b-8271941b6282" alt=""><figcaption></figcaption></figure>

8. Select **On Failure** from the dropdown as per your requirement. For example: Continue Run, Halt Run, Re-Run, Run next Test Case.

{% hint style="info" %}
To learn more about On Failure, [click here](https://docs.avoautomation.com/working-with-the-avo-assure-platform/create-and-execute-tests-with-design-studio/working-with-execution-section/creating-execution-list/on-failure).
{% endhint %}

<figure><img src="https://2174257472-files.gitbook.io/~/files/v0/b/gitbook-x-prod.appspot.com/o/spaces%2Fk8QZzXZMIJSStKAzDSTu%2Fuploads%2FjberpBWM6e5lMneoBb7v%2Fimage.png?alt=media&#x26;token=02baef39-a736-4154-8036-e96002434916" alt=""><figcaption></figcaption></figure>

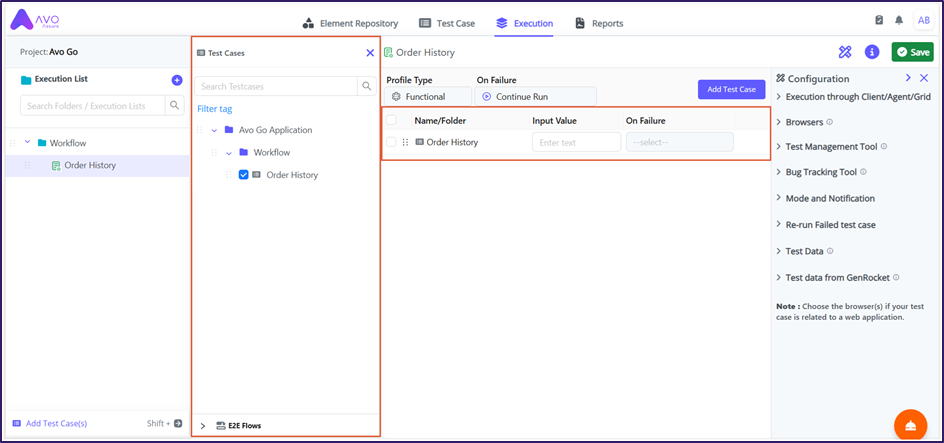
9. Select **Add Test Case**. The **Test Cases** window appears.

<figure><img src="https://2174257472-files.gitbook.io/~/files/v0/b/gitbook-x-prod.appspot.com/o/spaces%2Fk8QZzXZMIJSStKAzDSTu%2Fuploads%2FF8PgwfFFbV72nF2tV6Ti%2Fimage.png?alt=media&#x26;token=bc67acd1-aa33-466f-a70a-47e281b25637" alt=""><figcaption></figcaption></figure>

10. Drag Testcase from **Test Cases** window and drop it in Execution List

{% hint style="info" %}
**Note**:&#x20;

* When you add a folder to the Execution List, the system includes all Testcases inside that folder and its subfolders.
* If you have created E2E flows, you can add them to the **Execution List**.
  {% endhint %}

<figure><img src="https://2174257472-files.gitbook.io/~/files/v0/b/gitbook-x-prod.appspot.com/o/spaces%2Fk8QZzXZMIJSStKAzDSTu%2Fuploads%2F4Wsm3LunXmz9JtoD9Odn%2Fimage.png?alt=media&#x26;token=e9cb5a24-bd26-4dc0-8ff0-ad8987f74d70" alt=""><figcaption></figcaption></figure>

11. In the **Input Value** field, enter the new Excel file path or Data Table path to override on the test data on Testcase. (If needed)

{% hint style="info" %}
**Example**:

When you used Test data through Data parameterization and in case it got changed, you can directly provide the new Excel path in the Input value instead of updating it inside every Testcase or Test Step Group.

**Example**:

* You have 5 Test Cases that use OldData.xlsx.
* Your test data changes, and you now have NewData.xlsx.
* Instead of updating each Test Case file path manually, you enter NewData.xlsx in the **Input Value** field.
* The Execution List runs all Test Cases using NewData.xlsx as the **globally declared data**, which **overrides** the Excel file paths in the individual Test Cases.
  {% endhint %}

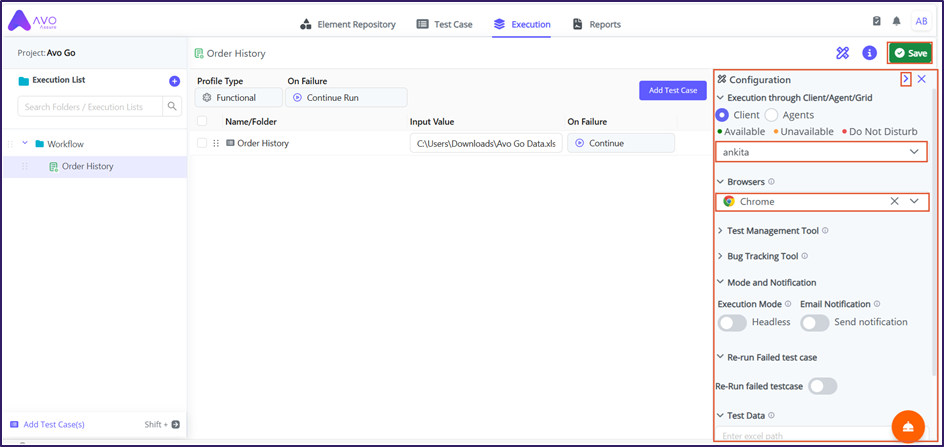
12. Select **On Failure** from the dropdown according to your requirement. By default, it is set to **Continue Run**.

{% hint style="info" %}
**Note**: You can select the **On Failure** type for an individual Testcase or for all Testcases in the Execution List.
{% endhint %}

<figure><img src="https://2174257472-files.gitbook.io/~/files/v0/b/gitbook-x-prod.appspot.com/o/spaces%2Fk8QZzXZMIJSStKAzDSTu%2Fuploads%2FCmFkr6eKH56vaKvXofrE%2Fimage.png?alt=media&#x26;token=04532496-81e2-4a01-a7df-b5438062988f" alt=""><figcaption></figcaption></figure>

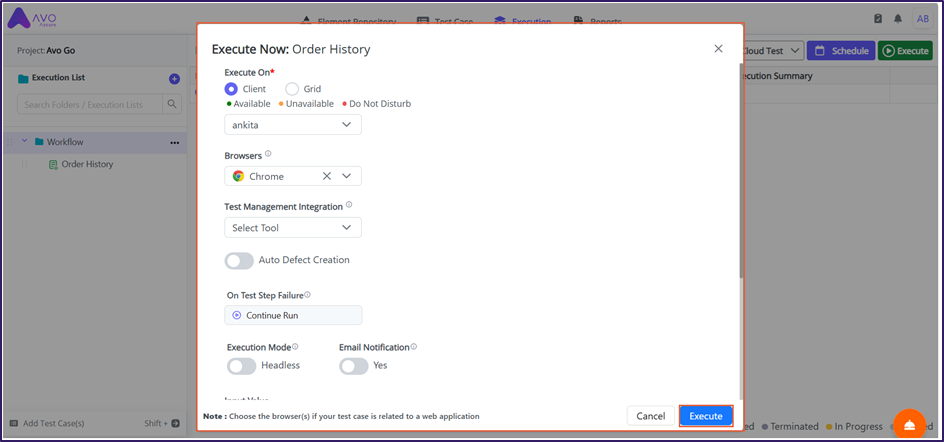
13. Expand **Configuration** window from the right panel. Select active **Client**, **Agent**, or **Grid** to choose the execution mode:

* **Client**: Runs the Execution List on the local machine.
* **Agent**: Runs the Execution List on a remote machine and can execute tests in parallel or distributed mode using an installed Agent.
* **Grid**: Executes the Execution List in parallel or distributed mode across multiple machines.

{% hint style="info" %}
**Note**: You can execute the Execution List through **Client**, **Agent**, or **Grid**.
{% endhint %}

14. Select **Browser** for execution to specify the environment where the Testcases run.
15. Select **Save** to save all the configuration.

<figure><img src="https://2174257472-files.gitbook.io/~/files/v0/b/gitbook-x-prod.appspot.com/o/spaces%2Fk8QZzXZMIJSStKAzDSTu%2Fuploads%2Fj788dUO79tGbQN3r6254%2Fimage.png?alt=media&#x26;token=696470d7-304b-4b3b-9317-de44640d2baa" alt=""><figcaption></figcaption></figure>

16. Select parent folder and select **Execute** and the **Execution Now** pop-up appears.

<figure><img src="https://2174257472-files.gitbook.io/~/files/v0/b/gitbook-x-prod.appspot.com/o/spaces%2Fk8QZzXZMIJSStKAzDSTu%2Fuploads%2FKa548XIxOuQXAaeXK6iT%2Fimage.png?alt=media&#x26;token=e45b23ff-0328-42fa-8e2e-825c6df97b16" alt=""><figcaption></figcaption></figure>

17. Select **Execute** to execute the Execution List.

<figure><img src="https://2174257472-files.gitbook.io/~/files/v0/b/gitbook-x-prod.appspot.com/o/spaces%2Fk8QZzXZMIJSStKAzDSTu%2Fuploads%2Frb3cnvzkwoGqxhiyM5X1%2Fimage.png?alt=media&#x26;token=ec6419d8-d9d8-41f1-ac0c-4a5066d4a3dc" alt=""><figcaption></figcaption></figure>
