# Monitoring and Managing Client
This section allows you to manage the client's connectivity and maintenance. Use this section to manage server connections, monitor real-time execution status through console logs, and update the application client directly.
The Avo Assure Client includes the following tabs:
* [**Console Logs**](#console-logs)
* [**Configuration**](#configuration)
* [**Help**](#help)
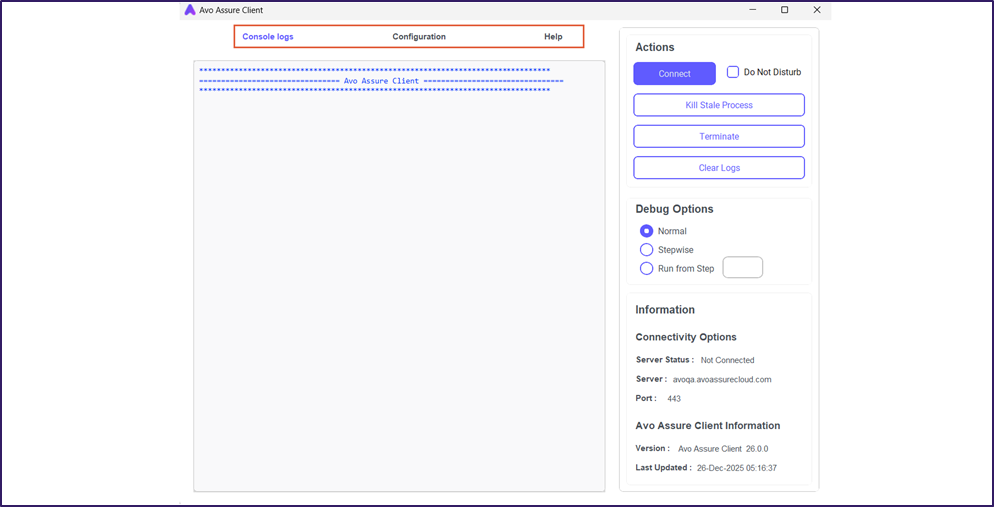
## **Console Logs**
The Console Logs feature displays real-time records of the test execution. You use this interface to monitor the progress of your scenarios, verify successful operations, and immediately identify any errors or warnings.
The logs provide a detailed breakdown of the test execution flow. For each step, the console displays the following information:
* **Timestamp:** Displays the specific date and time when the action occurred.
* **Sequence Number:** Displays the order in which the step executes.
* **Element Properties:** Displays the details regarding the specific UI element interacted with during the step.
* **Action:** Displays the specific operation performed (such as clicking a button or entering text).
* **Execution Status:** Displays the outcome of the step marked as either Pass or Fail.
This detailed view allows you to analyze the specific actions taken at every stage and confirm the final result of your test scenario.
## Configuration
The Configuration feature manages the connection between the Avo Assure Client and the Avo Assure server. You use it to configure IP addresses, port numbers, and other required system settings for successful communication. It also lets you customize client behavior to suit your testing environment.
The Configuration section contains the following options:
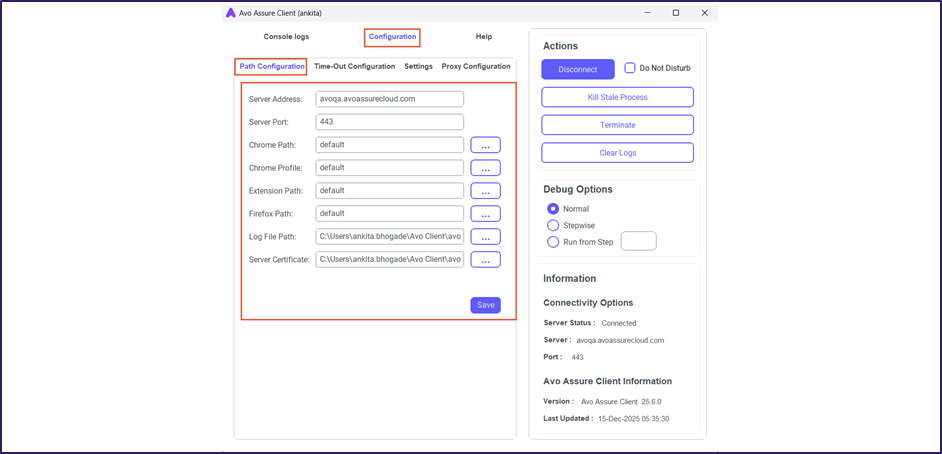
Path Configuration
This **Path Configuration** tab set up the connection between the client and the Avo Assure web application. You use this tab to tell the client where to find browsers, logs, and security certificates.
The **Path Configuration** tab contains the following options:
* **Server Address**: The system automatically fills this field with the Web Server hostname during registration. It matches the Avo Assure product URL.
* **Server Port**: The system automatically fills this field with the port number during registration. If you use a patch updater, enter the default port **443**.
* **Chrome Path**: Enter the installation location of the Google Chrome browser. If you type **default**, the client finds the location automatically.
* **Chrome Profile**: Enter the path to your specific Chrome user profile data. This setting applies only to Chrome-based applications.
* **Extension Path**: Enter the folder path for browser extensions. This applies only to Chrome and Chromium browsers. Use **default** if you do not need to configure extensions.
* **Firefox Path**: Enter the installation location of the Mozilla Firefox browser. If you type **default**, the client finds the location automatically.
* **Log File Path**: Select the folder where the client saves execution logs. You must create a folder named **Logs** and browse to it. If the file does not exist, the system creates it automatically.
* **Default (Mac)**: `/Users/username/Desktop/AvoAssure_Avo Assure Client/logs/TestautoV2.log`
* **Default (Windows)**: `C:/TestautoV2.log`
* **Server Certificate**: This field specifies the full path to the Avo Assure web server certificate file (**server.crt**). Use the **CA\_BUNDLE** folder inside the Avo Assure directory. The system automatically finds the `server.crt` file in that folder and fills in the path.
* **Input**: Path to the server.crt file
* **Default value**: ./Scripts/CA\_BUNDLE/server.crt
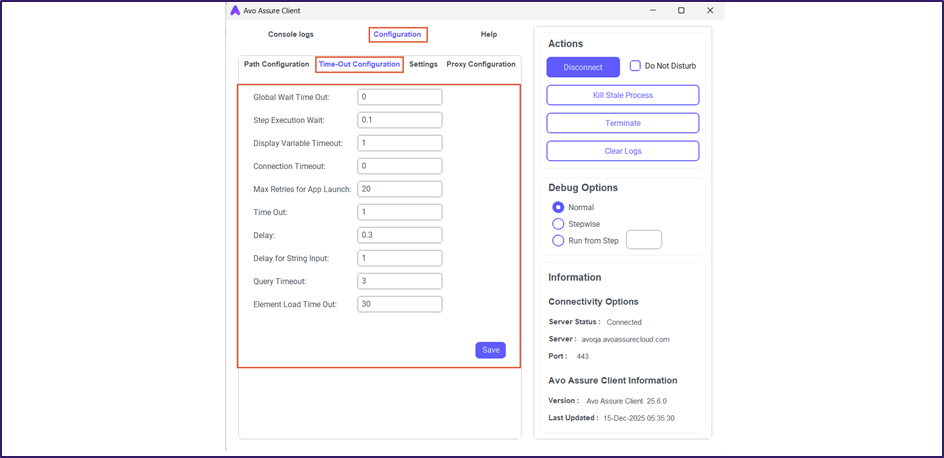
Time-Out Configuration
The **Time-Out Configuration** tab controls how long Avo Assure waits during test execution. These settings help prevent tests from getting stuck when an application, element, or system does not respond in time.
The following settings define the wait times used during test execution in Avo Assure:
* **Global Wait Time Out**: This sets how long Avo Assure waits for an element to appear in the application.
* **Default Value**: **0** (In second).
* Applies to all scraped elements across Web, Mobile Web and Desktop.
* If a test step has its own wait time, that value is used instead.
* **Step Execution Wait**: Adds a short wait before moving to the next test step.
* **Default Value**: **0.1** seconds.
* **Display Variable Timeout**: Controls how long the variable value popup stays visible.
* **Default Value**: **1** second.
{% hint style="info" %}
**Note:** This setting applies to the **Display Variable Value** Action.
{% endhint %}
* **Connection Timeout**: Sets how long the client waits before disconnecting from the server.
* **Default Value**: **0** (In Hours).
* **Max Retries for App Launch**: Defines how many times Avo Assure retries launching the PDF reader for **normalizePDF**.
* **Default Value**: **20** seconds.
* **Time Out**: Sets how long Avo Assure waits for an element to load on a page.
* Used for Web and Android native waits.
* **Default Value**: **1** second.
* **Delay**: Adds a wait before switching windows.
* **Default Value**: **0.3** second.
{% hint style="info" %}
**Note:** This setting applies to only for **Web applications**.
{% endhint %}
* **Delay for String Input**: Sets the pause between each keystroke while entering text.
* **Default Value**: **1** second.
{% hint style="info" %}
**Note**: This setting is applicable for the **Send Function Keys** Action.
{% endhint %}
* **Query Timeout**: Sets how long Avo Assure waits while connecting to a database.
* **Default Value**: **3** seconds.
* **Element Load Timeout**: Specifies how long the system waits for an element to load.
* **Default Value**: **30** seconds.
Settings
The **Settings** tab includes troubleshooting options and access controls. You use this page to choose different configurations based on your testing needs.
* **Custom Property**: Allows you to define a custom element attribute that the Avo Assure Client captures during element identification, such as data-testid, data-val-required or custom-id.
{% hint style="info" %}
**Note**: If the element contains the specified property, the system automatically captures it and assigns it the highest priority during identification. To know more about **Custom Property**, [click here](https://docs.avoautomation.com/working-with-the-avo-assure-platform/create-and-execute-tests-with-design-studio/working-with-element-repository-section/custom-property/configure-custom-property).
{% endhint %}
* **TLS Security Lemvel**: Controls whether the system verifies website security certificates or allows you to bypass the checks when certificates are unavailable.
* **High**: Checks both certificate and hostname.
* **Med**: Checks the certificate but ignores the hostname.
* **Low** (Default): Ignores both checks.
* **Ignore AUT Certificate**: Controls whether the system ignores security certificate warnings on the application under test (AUT). This setting applies to Internet Explorer only.
* **Yes**: Ignores the warnings.
* **No** (Default): Reports the warnings.
* **IE Architecture Type**: Selects the correct Internet Explorer driver based on your system type.
* **64-bit** (Default): Uses the 64-bit driver.
* **32-bit**: Uses the 32-bit driver.
* **Exception Flag**: Controls how the system behaves when an error occurs, such as Object not found).
* **True**: Stops the current scenario when an error occurs and continues execution with the next scenario in the test case.
* **False** (Default): Ignores the error and continues execution with the next test step.
* **Ignore Visibility Check**: Controls whether the system checks if an element is visible on the screen before interacting with it.
* **Yes**: Skips the visibility check and attempts to interact with the element.
* **No** (Default): Checks whether the element is visible before interacting with it.
{% hint style="info" %}
**Note**: This setting applies to Web applications.
{% endhint %}
* **HTTP Status Code Check**: Controls whether the test stops when the website returns a server error, such as 404 – Page Not Found.
* **Yes** (Default): Stops the test when an error occurs.
* **No**: Continues the test when an error occurs.
* **Browser Check**: Verifies whether the installed browsers are compatible with the current client version.
* **Yes** (Default): Performs the compatibility check.
* **No**: Skips the check.
* **Enable Security Check**: Automatically sets all Internet Explorer security zones to the same level.
* **Yes**: Applies uniform security settings.
* **No** (Default): Does not change security settings.
* **Highlight Check**: Highlights the item on the screen when the test verifies its existence.
* **Yes**: Highlights the item.
* **No** (Default): Does not highlight the item.
* **Prediction for IRIS Objects**: It enables or disables IRIS prediction based on its value.
* **Yes**: Enables prediction.
* **No** (Default): Disables prediction.
* **Hide Soft. Keyboard**: Indicates whether the keypad is hidden or displayed on Android devices.
* **Yes**: Hides the keyboard.
* **No** (Default): Shows the keyboard.
{% hint style="info" %}
**Note**: This option applies only for Android-based applications.
{% endhint %}
* **Extension Enable**: Controls whether the system pauses execution during debugging when an object is not found, allowing you to scrape the object and continue.
* **Yes**: Pauses the execution and allows you to scrape the required object before continuing.
* **No (Default)**: Does not pause the execution and continues even if the object is not found.
* **Update Check:** Automatically checks for ICE/Client updates when you connect to the server.
* **Yes**: Checks for updates.
* **No** (Default): Does not check for updates.
* **Clear Cache:** Deletes temporary browser files before starting the test.
* **Yes**: Clears the cache.
* **No** (Default): Keeps the cache.
* **Full Screenshot**: Controls whether the system captures full-screen screenshots.
* **Yes**: Captures full-screen screenshots.
* **No** (Default): Does not capture full-screen screenshots.
* **Close Browser Popup**: Controls whether the system uses a custom internal debug port to launch the browser.
* **Yes** (Default): Automatically closes any pop-up windows generated by the browser.
* **No**: Keeps the browser pop-up windows open.
{% hint style="info" %}
**Note**: This setting applies only to Web applications.
{% endhint %}
* **Use Custom Debug Port**: Controls whether the system uses a custom internal debug port to launch the browser.
* **Yes**: It uses a custom debug port to launch the browser.
* **No** (Default): It uses the system default port to launch the browser.
{% hint style="info" %}
**Note**: This setting applies only to Web applications.
{% endhint %}
* **Disable Screen Timeout**: Controls whether the system prevents the screen from locking or turning off during test execution.
* **Yes**: Disables the screen timeout during execution.
* **No** (Default): Keeps the system screen timeout unchanged.
{% hint style="info" %}
**Note:**
* If Avo Assure Client is run as admin, then the **Disable Screen Timeout** option is enabled.
* If Avo Assure Client does not run as admin, then the **Disable Screen Timeout** option is disabled.
{% endhint %}
* **Incognito Private Mode**: Runs the test in a private browser window that does not save history.
* **Yes**: Enables private mode.
* **No** (Default): Disables private mode.
* **Kill Stale Process**: Controls whether the system closes old background processes started by Avo Assure before each execution.
* **Yes** (Default): Closes old processes.
* **No**: Keeps old processes running.
* **Browser Screenshots**: Controls how the system captures screenshots for web applications.
* **Yes** (Default): Captures screenshots using the browser driver.
* **No**: Captures generic screenshots using the operating system.
* **Logger Level**: The logger level determines how much detail appears in the test reports.
* **Info** (Default): Shows the basic progress, including pass or fail status and reasons for failure.
* **Debug**: Shows detailed technical logs. Use this for developer troubleshooting.
* **Error**: Shows only the error messages
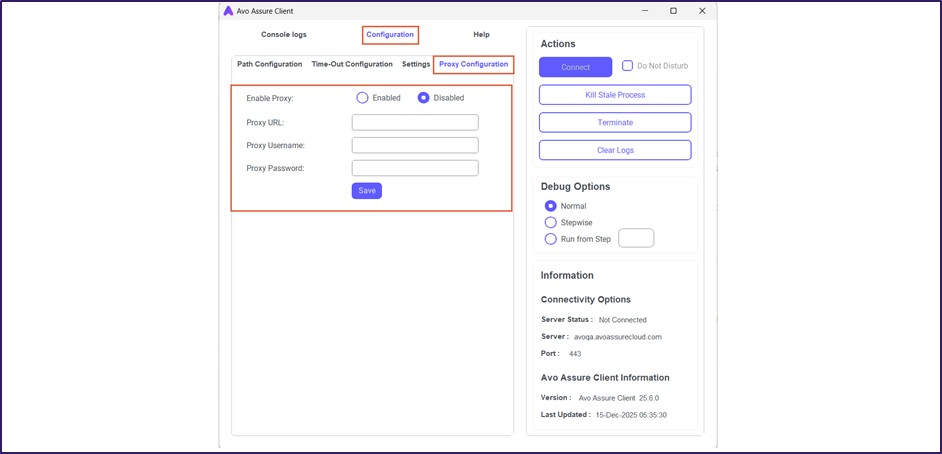
Proxy Configuration
This **Proxy Configuration** tab manages network connectivity and lets you enter proxy server details if your network requires a proxy to access the internet or the Avo Assure server. In networks with restricted access to certain URLs, you must configure a proxy to reach these URLs.
Avo Assure lets you enable or disable proxy configuration. When enabled, the following fields become editable:
* **Proxy URL**: Enter the proxy server address to access data or modify settings.
* **Proxy Username**: Enter the username required to authenticate with the proxy server.
* **Proxy Password**: Enter the encrypted password required to authenticate with the proxy server.
{% hint style="info" %}
**Note**: Use the **Encryption** option from utilities to encrypt the password. For more information, [click here](https://docs.avoautomation.com/utilities/encryption).
{% endhint %}
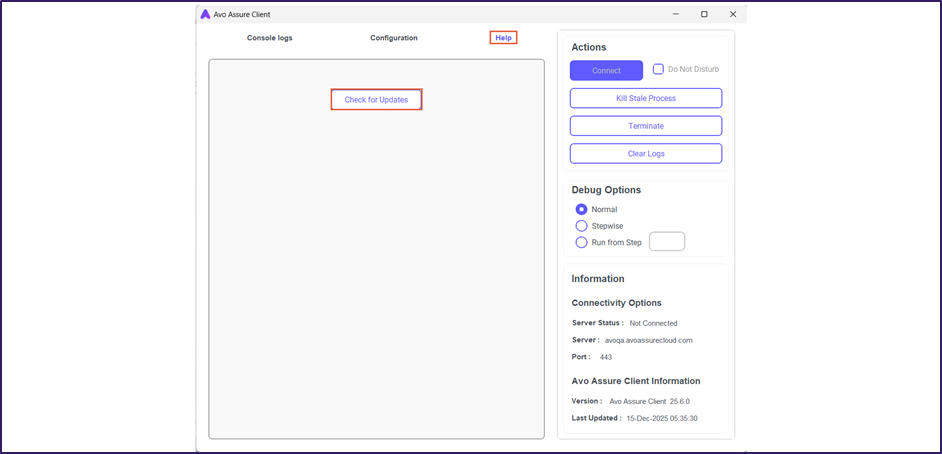
## Help
The Help feature maintain the application by allowing you to update the Avo Assure Client directly. You can update the client from the Help page in the Avo Assure Client window.
To update the Avo Assure Client, perform the following actions:
1. On the **Avo Assure Client** and select **Help**.
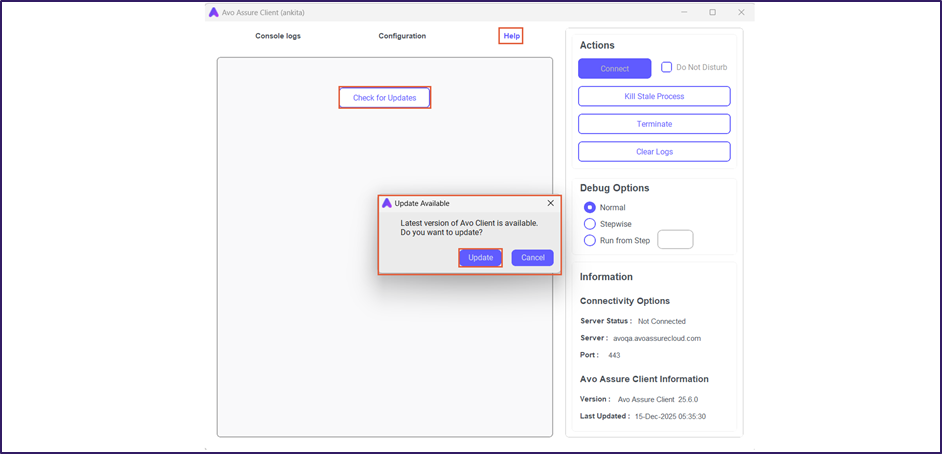
2. Select **Check for Updates** to check whether the latest update is available. The **Update Available** dialog opens.
{% hint style="info" %}
**Note**:
* If an update is available for the client, the **Update Available** dialog opens.
* If the client is already up to date, the **Update Check** dialog opens and displays the message as **Avo Assure Client is up to date**.
{% endhint %}
3. Select **Update** to download the latest version of the client.
4. Once the update completes, the **Update Complete** dialog opens.
5. Select **OK** to restart the client.
{% hint style="info" %}
**Note**: After the update completes, relaunch the client. For more details on how to relaunch the client, [click here](https://docs.avoautomation.com/introduction-to-avo-assure/avo-assure-client/features-of-avo-assure-client/broken-reference).
{% endhint %}