# Zephyr Integration in Avo Assure
1\. Select **project** from Projects list
2\. Click **Manage Integrations** link from Settings card. This will bring the Test Management window.
3. Select Zephyr icon from Test Management window
Zephyr configuration can be done by two ways: **Basic** and **Token**
With the **Basic** type of login,
i. Enter **Username**, **Password** and **URL** in their respective fields
ii. Hit the **Login** button to login to Zephyr and integrate it with Avo Assure
With **Token** type of login
i. Enter **URL** and **Token** in their respective fields
ii. Hit the **Login** button to login to Zephyr and integrate it with Avo Assure.
{% hint style="warning" %}
***Note:*** *Check the Remember Credentials checkbox to save the credentials for future use. This will auto load the details in the execution screen.*
{% endhint %}
4. After successful Configuration user can see the Zephyr mapping window on screen
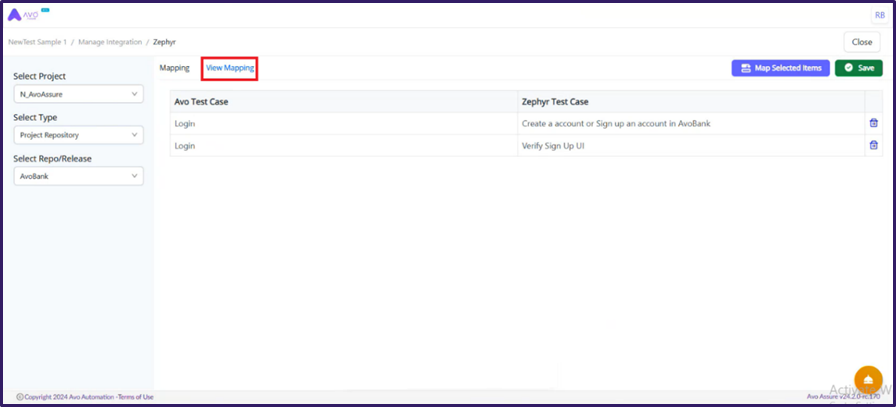
5. Provide details: Select **Project**, Select Type and Select **Repo/Release** from dropdown
6. On the mapping tab, select **Avo Test Case** from left pane of the screen and select **Zephyr Test Cases** from right pane of the Screen.\
\
There are 2 types of mapping supported in Avo Assure one-to-one and one-to-N
| | |
| ------------------ | ------------------------------------------------------------------------------------------------------------------ |
| one-to-one Mapping | One-to-one Mapping is when, one Avo Test Case from left pane is mapped with one Zephyr Test Case in right pane. |
| one-to-N Mapping | One-to-n Mapping is when, one Avo Test Case from left pane is mapped with multiple Zephyr Test Case in right pane. |
7. Click **Map selected Items** button to map Test Case with Zephyr
8. Click **Save** button to save the mapping
{% hint style="warning" %}
***Note:** When you are logged into the Zephyr, Mapping tab is by default selected*
{% endhint %}
9. Click **View Mapping** tab, to view the mapped Test Cases between Avo Assure and Zephyr
10. After successfully mapping Avo Assure Test Cases with Zephyr Test Cases, click close button to navigate to landing page of Avo Assure