> For the complete documentation index, see [llms.txt](https://docs.avoautomation.com/llms.txt). Markdown versions of documentation pages are available by appending `.md` to page URLs; this page is available as [Markdown](https://docs.avoautomation.com/avo-assure/create-and-execute-tests-with-design-studio/working-with-execution-section/creating-execution-list.md).
# Creating Execution List
To create an execution list in Avo Assure, perform the following steps:
1. On the **Home** page, under **Projects**, select the required project from the list.
2. Select **Design Studio** > **Execution**.
3. Select **Create new folder.**\
Here are the ways to create a new folder:
a.Plus icon (+)
1. Select Plus icon **(+)** from left panel of the **Execution** tab.
2. Select **Create new folder**.
3. Rename the folder with appropriate name.
b.Create Folder
1. Select **Create Folder**. It is located at the center of the **Execution** tab.
{% hint style="info" %}
**Note**: You can use the shortcut key **Shift+F** to create a new folder.
{% endhint %}
2. Rename the folder with an appropriate name.
5. Select **Create Execution List**.\
Here are the ways to create a new folder:
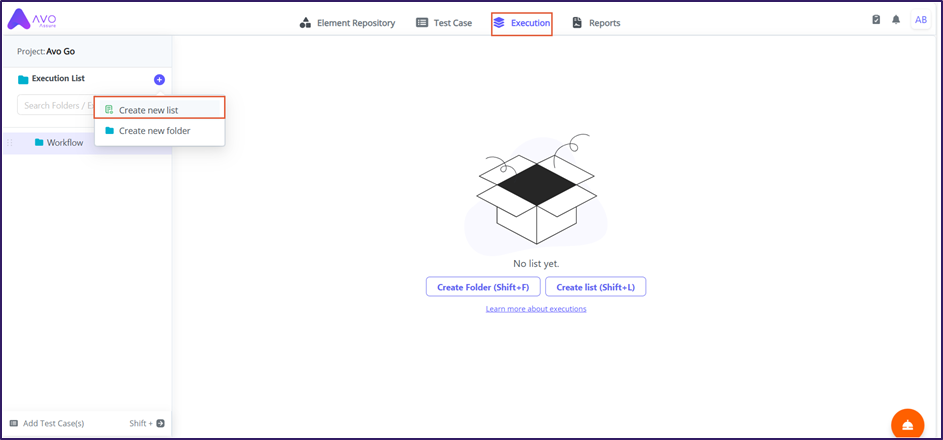
a. Plus icon (+)
1. Select Plus icon **(+)** from left panel of the **Execution** tab.
2. Select **Create new list** option.
3. Rename the Execution List with an appropriate name.
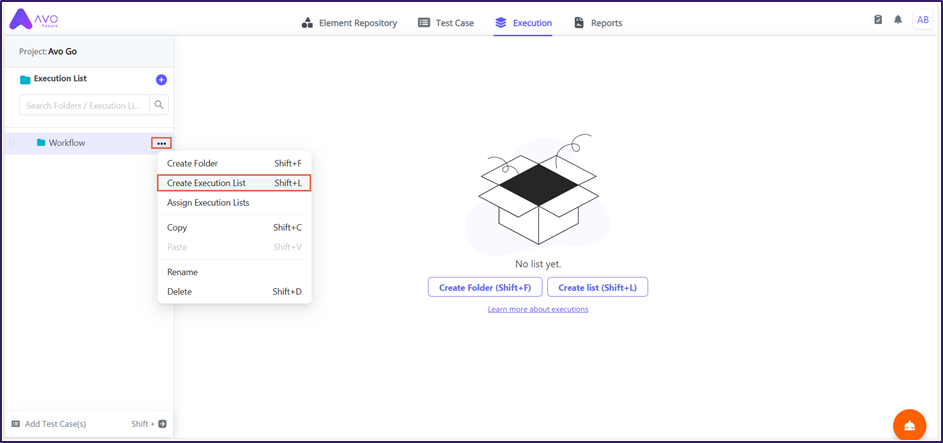
b.Ellipsis icon (...)
1. Select Ellipsis icon **(...)** from the folder.
2. Select **Create Execution List** option.
3. Rename the Execution List with an appropriate name.
{% hint style="info" %}
**Note**: You can use the shortcut key **Shift+L** to create a new Execution List.
{% endhint %}
c. Create list
1. Select **Create List.** It is at the center of the **Execution** tab.
3. Rename the Execution List with an appropriate name.
{% hint style="info" %}
**Note**: You can use the shortcut key **Shift+L** to create a new Execution List.
{% endhint %}
7. From **Profile Type** dropdown, select **Functional.**
{% hint style="info" %}
**Note: Functional** profile type is used for regular execution modules, and it focuses on application's function.
{% endhint %}
8. Select [**On Failure** ](/avo-assure/create-and-execute-tests-with-design-studio/working-with-execution-section/creating-execution-list/on-failure.md)from the dropdown as per your requirement. For example: **Continue Run**, **Halt Run**, **Re-Run**, and **Run next Test Case**.
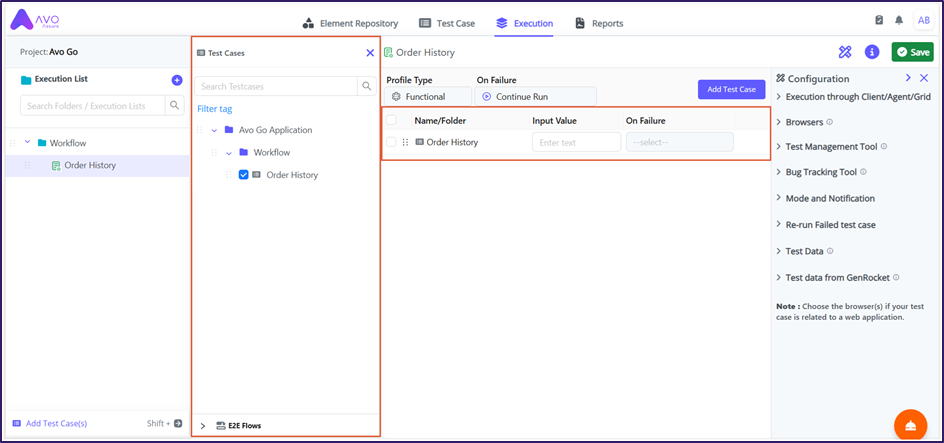
9. Select **Add Test Case**. The **Test Cases** window appears.
10. Drag Testcase from **Test Cases** window and drop it in Execution List
{% hint style="info" %}
**Note**:
* When you add a folder to the Execution List, the system includes all Testcases inside that folder and its subfolders.
* If you have created E2E flows, you can add them to the **Execution List**.
{% endhint %}
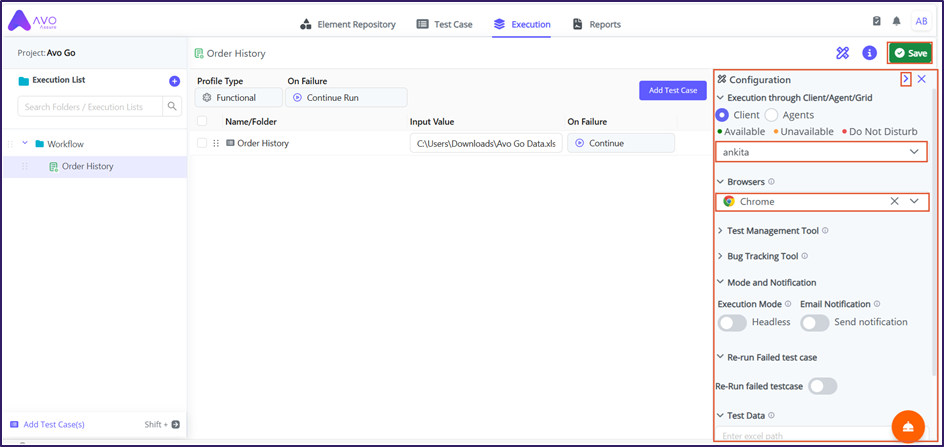
11. In the **Input Value**, enter the new Excel file path or Data Table path to override on the test data on Testcase. (If needed)
{% hint style="info" %}
**Example**:
When you used Test data through Data parameterization and in case it got changed, you can directly provide the new Excel path in the Input value instead of updating it inside every Testcase or Test Step Group.
**Example**:
* You have 5 Test Cases that use OldData.xlsx.
* Your test data changes, and you now have NewData.xlsx.
* Instead of updating each Test Case file path manually, you enter NewData.xlsx in the **Input Value** field.
* The Execution List runs all Test Cases using NewData.xlsx as the **globally declared data**, which **overrides** the Excel file paths in the individual Test Cases.
{% endhint %}
12. Select **On Failure** from the dropdown according to your requirement. By default, it is set to **Continue Run**.
{% hint style="info" %}
**Note**: You can select the **On Failure** type for an individual Testcase or for all Testcases in the Execution List.
{% endhint %}
13. Expand **Configuration** window from the right panel. Select active **Client**, **Agent**, or **Grid** to choose the execution mode:
* **Client**: Runs the Execution List on the local machine.
* **Agent**: Runs the Execution List on a remote machine and can execute tests in parallel or distributed mode using an installed Agent.
* **Grid**: Executes the Execution List in parallel or distributed mode across multiple machines.
{% hint style="info" %}
**Note**: You can execute the Execution List through **Client**, **Agent**, or **Grid**.
{% endhint %}
14. Select **Browser** for execution to specify the environment where the Testcases run.
15. Select **Save** to save all the configuration.
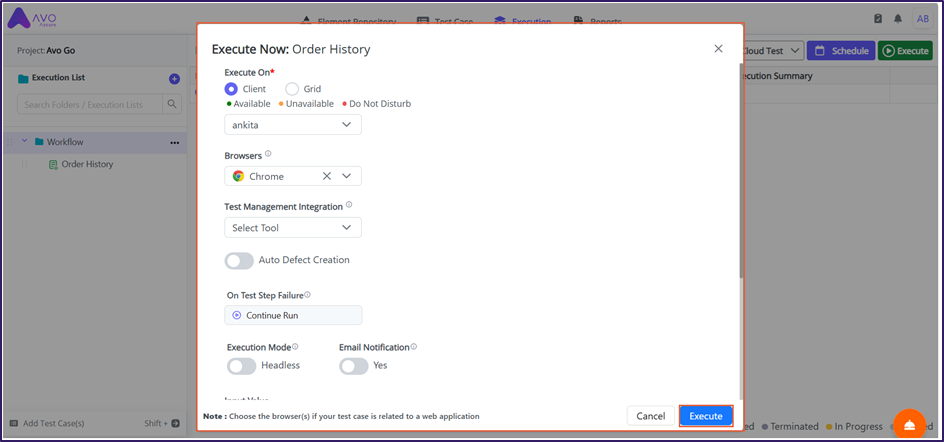
16. Select parent folder and select **Execute.** The **Execution Now** pop-up appears.
17. Select **Execute** to execute the Execution List.
---
# Agent Instructions
This documentation is published with GitBook. GitBook is the documentation platform designed so that both humans and AI agents can read, navigate, and reason over technical content effectively. Learn more at gitbook.com.
## Querying This Documentation
If you need additional information that is not directly available in this page, you can query the documentation by asking a question.
Perform an HTTP GET request on the following URL with the `ask` and `goal` query parameters:
```
GET https://docs.avoautomation.com/avo-assure/create-and-execute-tests-with-design-studio/working-with-execution-section/creating-execution-list.md?ask=&goal=
```
`ask` is the immediate question: it should be specific, self-contained, and written in natural language.
`goal` is what the user is ultimately trying to achieve, the reason they need the answer. Sharing it helps GitBook give you a better, more relevant answer. A goal is most helpful when it describes the outcome the user wants rather than restating the question. For example, with `ask=how do I create an API token`, a goal like `automate deployments from our CI pipeline` lets GitBook tailor the answer to that use case.
The response will contain a direct answer to the question and relevant excerpts and sources from the documentation.
Use this mechanism when the answer is not explicitly present in the current page, you need clarification or additional context, or you want to retrieve related documentation sections.